Blog Posts

Final Design Review

This week Macro Mice gave the last presentation on our project, the Final Design Review. While we are happy with the results of our project, we are sad to leave it.

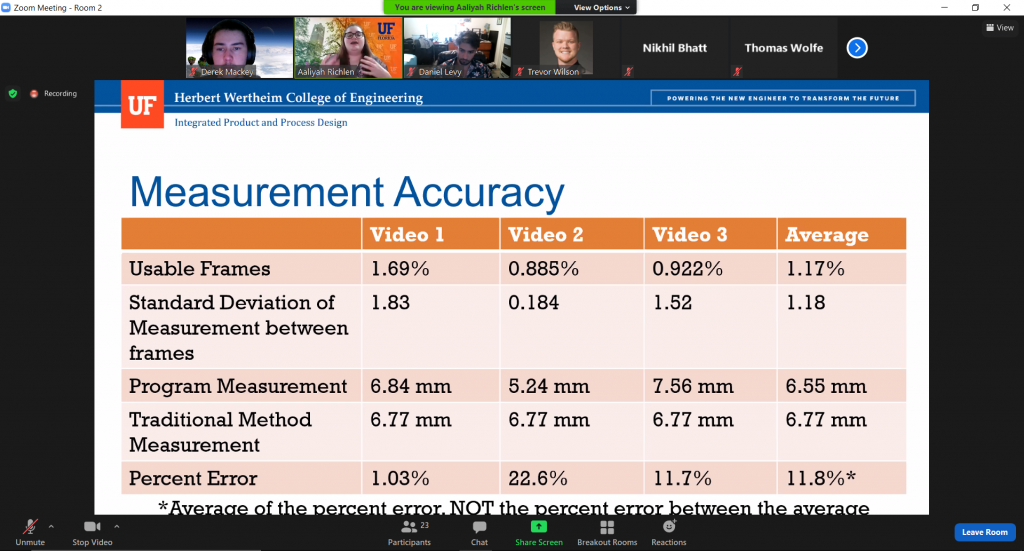
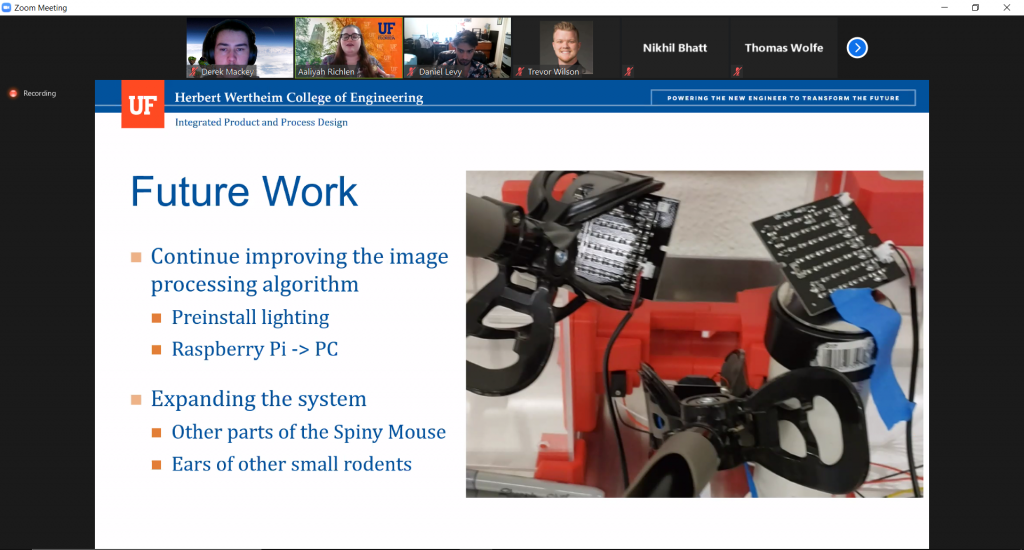
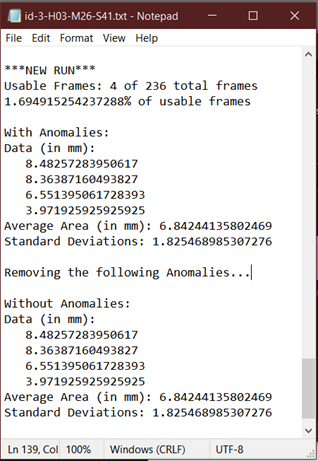
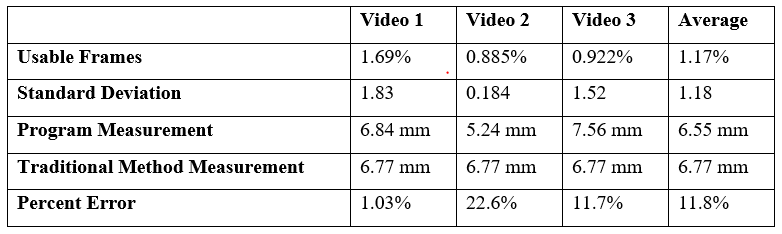
While Macro Mice plans on continuing improving the prototype into the summer and fall, this event marked the end of our time at IPPD. In our final presentation, the team presented how our prototype works, a demo of the prototype, our results (including Technical Performance Measures that were met and unmet), and the future goals of the team. In addition to this, in our final report, we went into more detail how the prototype works, how to set it up and use it, a list of materials, and the prototype’s results. We would like to highlight that the main goal of the project was to get a percent error measurement accuracy (when compared to the traditional method of measurement) of less than 25% and we achieved this in the end with a percent error of 11.8%. However, we believe that is can be improved, and the plan of action table on the next page documents some of the ways we plan to attack this. This includes creating permanent mounts for the camera and lighting equipment and improving the image processing algorithm itself. While we are finishing our time with IPPD officially next week, we hope to continue to use lab space and equipment to do this. We will draft a plan for IPPD admin, so they understand what we hope to do.

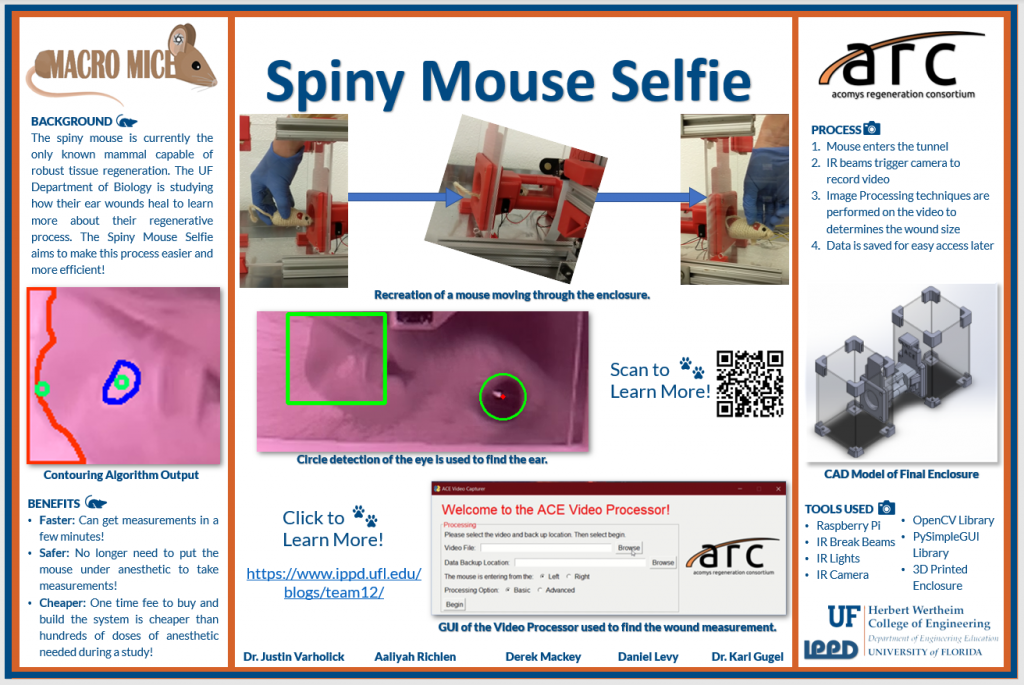
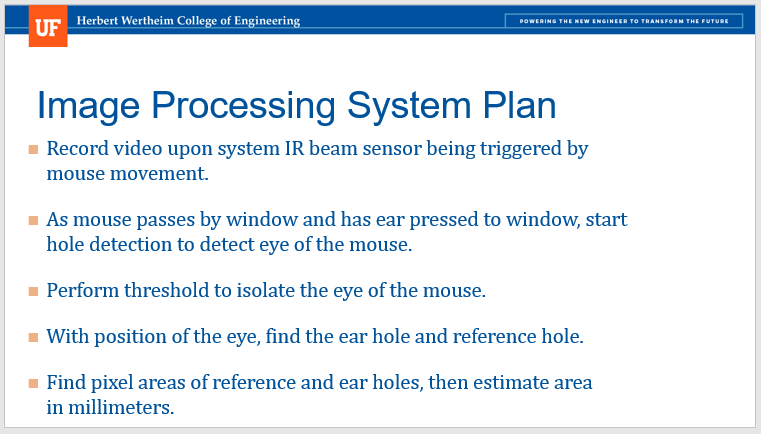
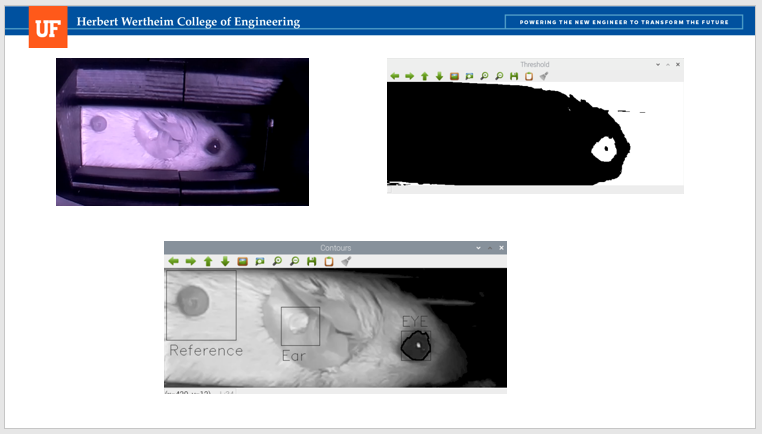
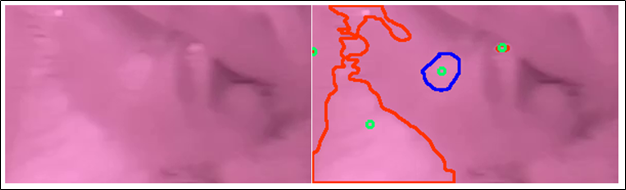
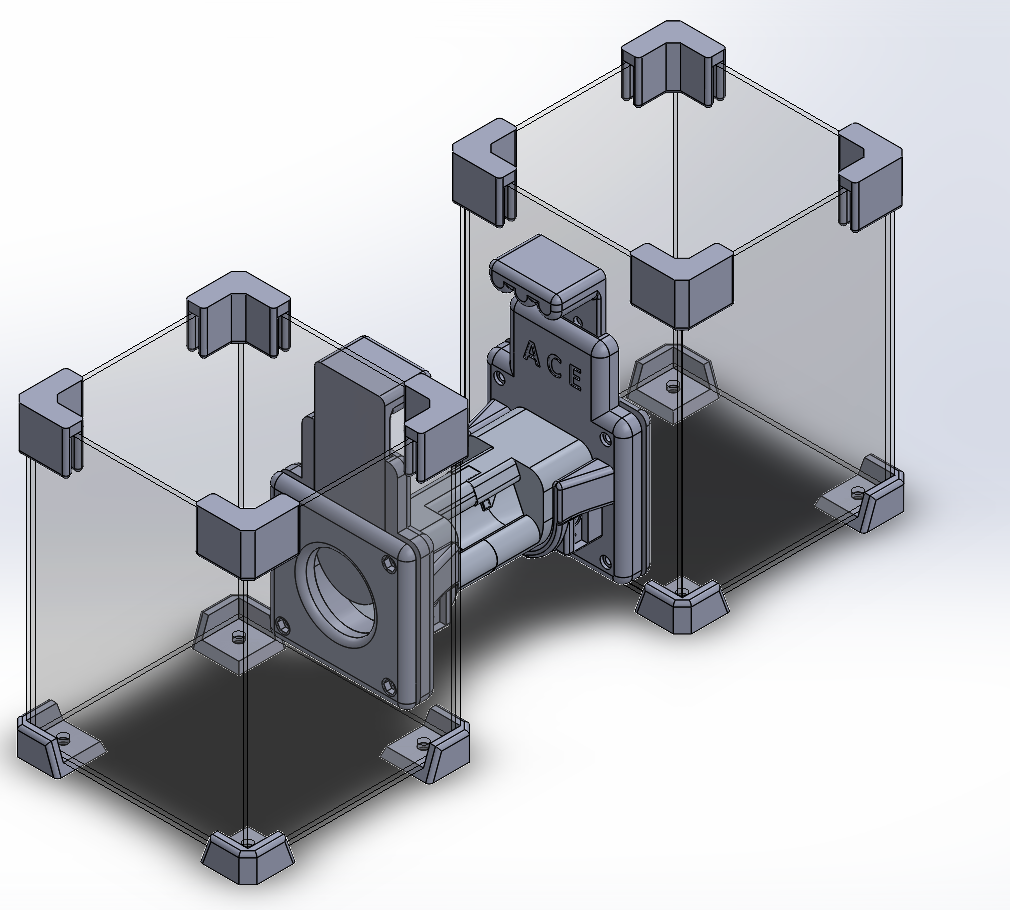
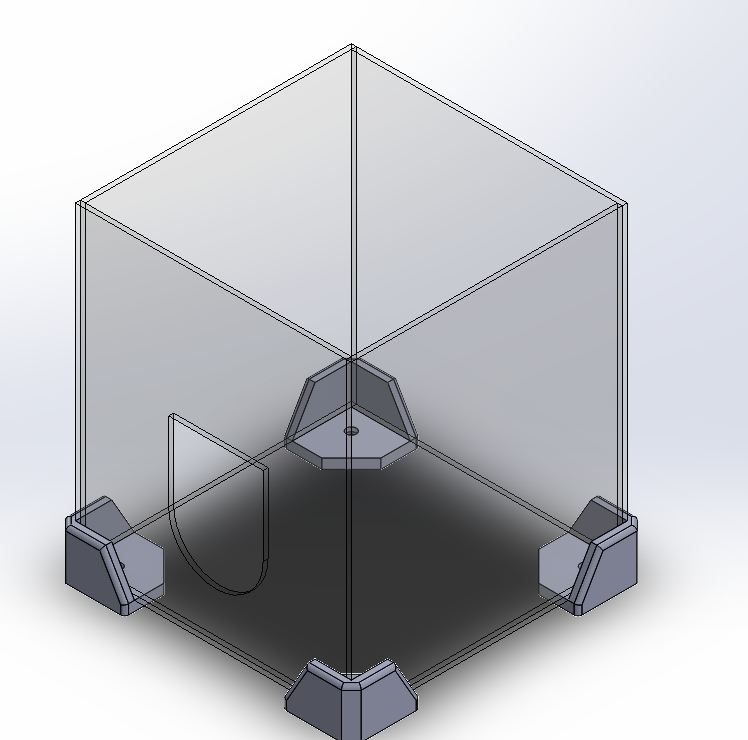
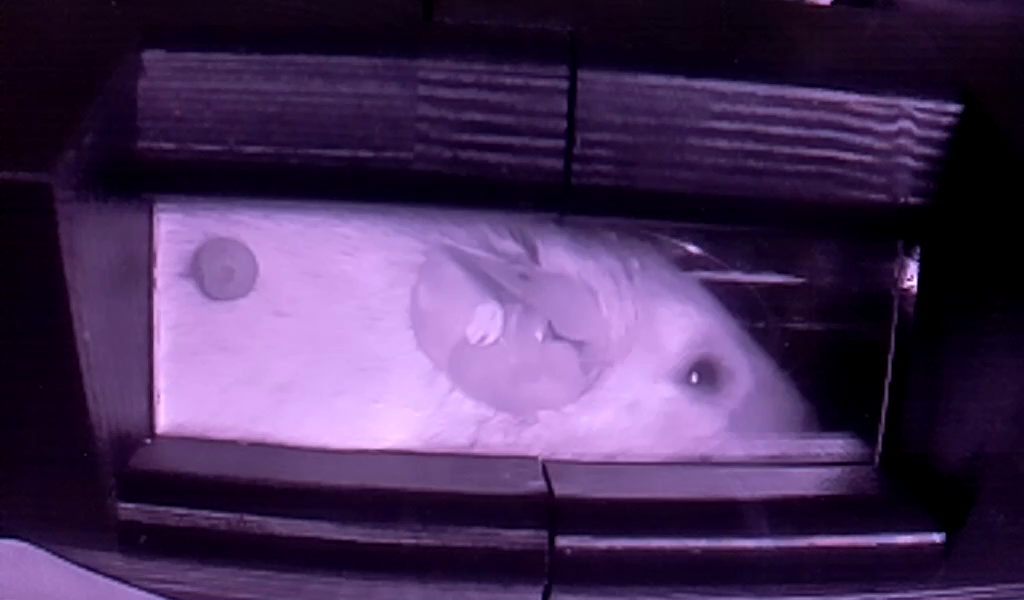
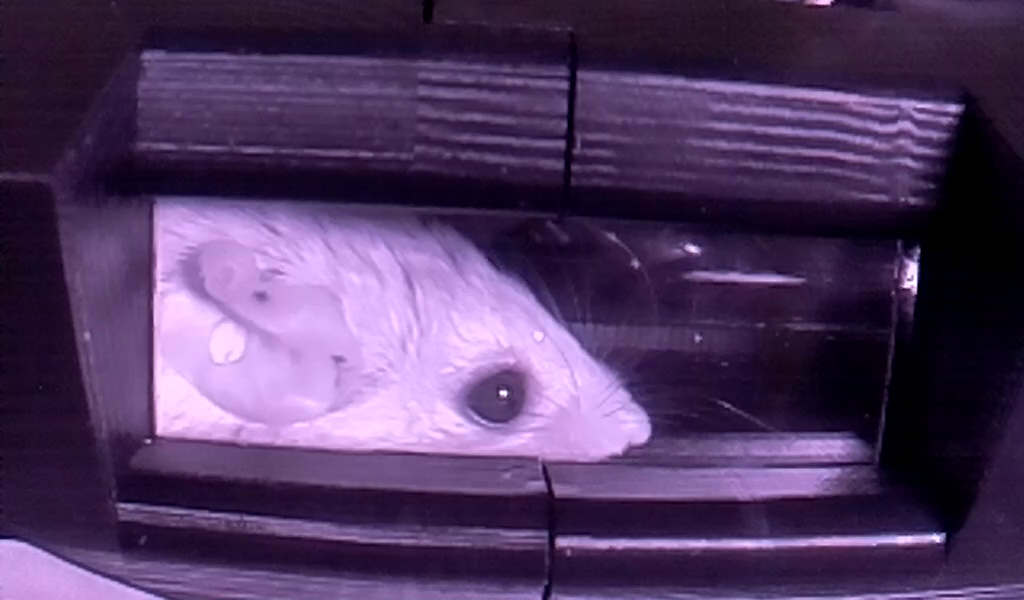
Some of the agreements made at the beginning of the project have significantly changed. Our original design focused on the mouse reaching for a treat and in that moment the mouse would be still enough to get an image of the ear. We quickly realized that this would not work due to the behavior of the mouse. Instead, we switched to a tunnel model whereas when the mouse went through a tunnel, video was captured. We also changed our processing system from real time to post processing, as this would offer a higher chance of capturing the hole. With these changes, we met all specifications except the price of the system. The goal was to have a complete system under $200. However, we quickly realized that to get a decent measurement accuracy we would have to splurge for more expensive products, and this was approved by our coach and liaison. In the end, the cost of the system was $325.75.

We would like to close out this final post by thanking everyone who helped us along the way. We would not have had the opportunity to work on this project without the IPPD team at UF. We would also like to specifically thank Lizzie Meier, IPPD’s lab manager, whom without her help and quick response, the project would not have been finished in time. We would also like to thank our coach Dr. Karl Gugel, whose guidance helped us move in the right direction. Finally, we would like to thank our project liaison Dr. Varholick who went above and beyond the traditional liaison engineer role and helped design and complete this project as much as the rest of the team. And of course, we are grateful to him for introducing us to these remarkable little creatures.

Video Demo and Poster

As part of some IPPD deliverables, a video and poster were made to show off the Spiny Mouse Selfie. Take a look at them below!

clickable link: https://www.ippd.ufl.edu/blogs/team12/

Tagged as: , ,

Prototype Inspection Day

Many weeks ago, Macro Mice gave an update on the current state of the prototype to receive feedback. Below are some screenshots from our presentation.

Measurement Accuracy

This week the team was finally able to get a numerical measurement from the Video Processor program. While it is unclear how replicable these results are due to the small amount of data tested, they do offer some reassurance that the system is headed in the right direction. Currently, the team achieved a measurement accuracy of 11.8%. Details of how these results were obtained are shown below! 

A demo of how the whole system works!
Example Data Log that is produces by the Video Processor.
Image of Ear captured by the Video Processor and the contours drawn by the Processor for that image. The blue represents the ear hole.
How the measurement accuracy percent error was determined. The average percent error is based on the average of the percent error, not on the percent error between the average program measurement and traditional measurement.

A New Name and Other Notes…

This week we accomplished a lot! On the software side, we decided to split our program into two parts. This first is a script that helps capture the video with the Raspberry Pi. The second is a script for a PC to analyze the video and get a measurement. The Video Capturer script is complete, but we still need to make more changes to our Video Processor Script. However, we are confident we will be able to have it done by the end of the semester.  

On the hardware side, we built our last version of the enclosure and it looks amazing! You can see what it looks like in action in the video below. It includes a square reference object, which should help get more accurate measurements. The only parts missing are the camera and light mounts, but those should be done by next week. 

With the closing date of this project right around the corner, we do have some minor components to complete. This includes modifying the camera to make it smaller, completing the Video Processor script, building our camera and light mount, and testing the accuracy of our measurement process. We are also completing all our deliverable for IPPD including a final report, video, poster, and presentation. We hope to get this all done in the next week. 

Also, we should note that our device is no longer named the Spiny Mouse Selfie. Our project has changed drastically from the place we first started, so our team and our liaison thought it was time for a name change. Our project title is still the Spiny Mouse Selfie, but our device is now called the Acomys’ Caliper Enclosure, or ACE for short! 

[Video was redacted due to research restrictions]

Tagged as: , , ,

Building the Final Prototype

This week the final steps of our project have fully taken shape. On the physical side of the project, we have begun manufacturing the final iteration of the enclosure. This has been an exciting process as we finally get to realize concepts that have been months in the making. Fortunately, we have the help of the IPPD lab manager Elizabeth Meier in testing and producing all the 3D printed parts and acrylic panels. With two thirds of our team out of town, Ms. Meier has been instrumental in the completion of this project. Check out some pictures below! 

On the software side, we have been testing individual features of our image processing program and will finally be combining all our features to test how it works with video. This is the final stages of our project and we are happy to see all our hard work be added into the final product.  

Something to Consider…

With recent lab trips, we have seen odd behavior occurring with our camera and how difficult it is to acquire good frames with Raspberry Pi compatible cameras. We have thought about switching processors. If we were to use a PC, we could use a higher end camera that is a few hundred dollars as opposed to the thirty-dollar ones we use now. A camera with better specs in tandem with a PC that can process much faster and efficient than the Raspberry Pi could make our product quality jump at the sacrifice of cost. This is a last-minute change and will probably have new issues arise as a result, but it is something our group has been considering, and we will be reaching a conclusion by next week.  

On the physical enclosure side, we are close to completing the final design of the physical enclosure. This will allow for more reliable testing more consistent with the ultimate version of the product. The remaining work to be done on this is the completion of clear acrylic part drawings for manufacturing, and the redesign of the existing enclosure parts. See the images below! 

Running into some issues

This week we did some more testing in the lab and had some good outcomes and some negative ones. We have the prototype in a place where we are confident out liaison can run tests without us, giving us the ability to get more data faster. However, we found that by setting both the resolution and the framerate on the camera led to the change in framerate being ignored, taking video we don’t want. We also found that the mouse will reflect the IR light too much, where it will blow out the frame. We are looking into ways to solve both problems. Despite this, we did get a few good frames that we can view below. 

Tagged as: ,

Continuing the Prototype

This week, we continued work on the prototype. Physically, we soldered the wires of the IR beam and continued to play with the positioning of the lighting. Additionally, we have begun work on the final version of the physical enclosure of the Behavioral Unit. Aiming to be as accessible and aesthetically pleasing as possible, the additional design challenges in this have been incredibly interesting. This week we also made some very productive changes to the testing setup, opting to use a flexible phone holder to align the camera instead of mounted 80/20. This has allowed for greater versatility and simplicity in testing. Check out some of the images below! 

On the software side, we continued to work on our GUI. We added some testing functionality so the user can test the IR beam. We also added an ability to choose which direction the mouse enters from so holes from either side can be measured. We also tested that the data was saved to an external USB drive and the data could be accessed on other devices. We added a logo as well. After review from our liaison, it seems like the GUI is almost finished. We have a few more minor adjustments (adding a failsafe start, adding detailed text directions, finished logo) and it will be finished. Check out our video below! [Note: The actual recording of footage cannot be seen by the screen recorder, but the user can see the video being recorded. However, the recorded video is opened and played towards the end of the video to show that it was saved correctly.] 

Our cameras do not allow us to be very up close to the mice, so it must be distanced from the window to get good quality frames to analyze. The drawback of this is hole detection becomes much harder since the frame contains a lot of outside noise that could interfere with the image analysis. To mitigate this, we plan on have fixed positions in a frame that will be cropped beforehand to eliminate anything that is not the reference hole or the mouse ear. This will make the image analysis more accurate since there are no other factors in the frame that can be picked up by our program.  

A Prototype in Progress

This week Macro Mice was able to take more videos with the live mice. From this we learned that the IR cameras are our best option, but we will have to figure out some ways to extend the lights, so they do not cause a glare in our images.  

We also improved our GUI this week and incorporated our IR beam. The program starts by asking the user for the mouse ID and the save file location. Once started, it waits for the IR beam to be triggered before taking video. Check out our demo below! (Note: The screen recorder cannot record the camera feed, but the user can see it. At the end of the demo, the video is opened to show that video was taken and saved to the desired location.)e

After meeting with our coach recently, we’ve found that given the reference hole and the mouse ear hole, we can reliably find the area of the mouse’s ear hole. Now we are looking into iteratively cropping our image so that we can isolate the holes in the image and then find the area of the hole using a thresholding technique.